A ceiling fan looks like a “bigger version of a light fixture” install, and that’s exactly the assumption that gets people in trouble. A ceiling light is a static load — three pounds, hanging there, doing nothing. A ceiling fan is twenty pounds, off-balance, vibrating constantly, with a torque arm trying to twist itself out of the ceiling sixty times a second. Standard ceiling boxes — the ones already up there from when the light fixture was installed — are not rated for that.
When a ceiling fan crashes onto the bed at 3 a.m., it’s almost always because the box was wrong. Replacing the box is the part nobody mentions in the YouTube videos.
Here’s the full job, from the box upgrade to the wiring to balancing the blades.
The One Question You Have to Answer First
Look up at the existing ceiling box. Is it labeled “fan-rated”? Most aren’t.
Three options:
- Box is already fan-rated. Lucky you. Skip to the wiring section.
- Box is not fan-rated, attic above is accessible. Easy upgrade — install a brace box from above. 30 minutes.
- Box is not fan-rated, no attic access (second floor with bedrooms above, or a vaulted ceiling). Use a “saddle” expanding ceiling-fan brace that installs through the existing hole — no need to cut drywall. About 20 minutes once you have the brace. Brand: most use the Westinghouse 0110000 or the Hubbell-Raco 936.
The brace is $15. Skipping this step is what kills people. Don’t skip it.
Tools and Materials
- The fan (with the included downrod, mounting bracket, and remote receiver)
- Fan-rated brace box (if you don’t already have one)
- A non-contact voltage tester
- Phillips screwdriver, flathead screwdriver, wire stripper, needle-nose pliers
- Step ladder tall enough to put your shoulders at the ceiling
- A friend or family member as a lift assist for 5 minutes (the fan motor housing is heavy)
- Wire nuts (usually included with the fan, but a few extras don’t hurt)
- Electrical tape
Safety: Kill the Power, Verify Twice
Step 1: Turn off the breaker that feeds the room. If there’s a wall switch that controls the existing light, leave the wall switch ON so you can confirm the fixture is dead.
Step 2: Verify with a voltage tester. Touch each wire coming out of the box. Tester silent? Good. Touch the box itself. Still silent? Now you can work.
This step is non-negotiable, even if you’re certain you flipped the right breaker. Old houses sometimes have the ceiling light and an upstairs outlet on the same circuit, and labels lie.
Remove the Old Light Fixture
- Unscrew the canopy nut or screws holding the existing light to the ceiling.
- Lower the fixture and disconnect the wire nuts joining the fixture wires to the house wires. Note which color goes to which: black to black, white to white, ground (bare or green) to ground.
- Set the old fixture aside.
Upgrade the Box (If Needed)
If you’re using an expanding-saddle brace:
- Remove the existing box from the ceiling. Most are nailed or screwed to the joist or to a thin metal bracket.
- Insert the brace through the hole, oriented perpendicular to the joists.
- Twist the brace’s expanding rod until the legs extend and bite into the joists on both sides. Snug, then a quarter turn more.
- Attach the included fan-rated metal box to the brace’s saddle U-bolt. Tighten the U-bolt nuts until the box is firmly clamped.
If you’re working from above through an attic:
- Cut a piece of 2×4 to fit between the joists where the box sits.
- Toenail it in place flush with the bottom of the joists, so the bottom of the 2×4 is at the same plane as the drywall.
- Mount the new fan-rated box to the bottom of that 2×4.
Either way: gently tug downward on the box. It should not move at all.
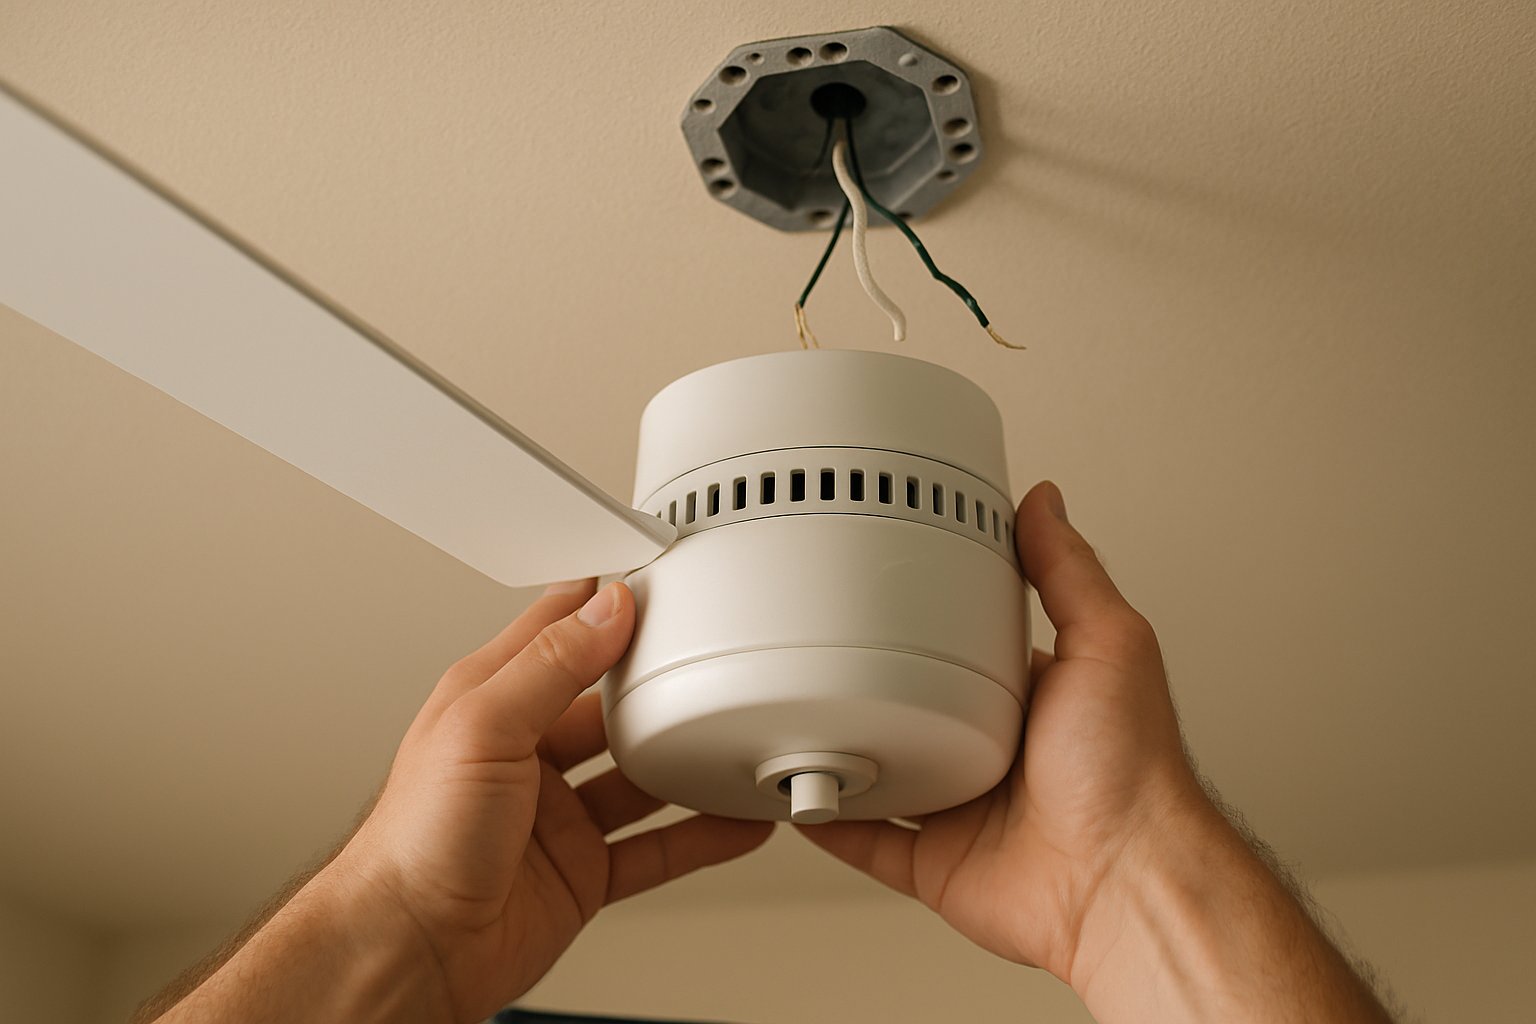
Wiring the Fan
Most modern ceiling fans wire like this:
- Black wire (fan motor) → Black wire (house — hot)
- Blue wire (fan light, if equipped) → Black or red wire (house). If you only have one black house wire and you want both fan and light on the same wall switch, twist the fan’s blue and black together with the house’s black. If you have a separate red wire from the house (a fan/light dual switch), keep them separate.
- White wire (fan) → White wire (house — neutral)
- Green or bare wire (fan) → Bare or green wire (house — ground)
Strip about 3/4 inch of insulation, twist matching wires together with the wire nut, and tug each connection — if any wire pulls out, redo it.
Tuck the wires into the box. Don’t cram — wires that are pinched against the box edge can short over time.
Hang the Motor Housing
This is the only step that genuinely benefits from a second person. The motor housing is heavy, and you need both hands free to attach the mounting bracket while it’s lifted.
- Most fans use a “hanger ball” — the downrod has a ball on top that drops into a slot on the mounting bracket. Lift, drop in, rotate so the ball seats.
- Tighten the bracket’s set screws to lock the ball in place.
- The motor now hangs by itself. You can let go and connect any remaining wires.
Attach Blades and Light Kit
Attach blades one at a time using the included screws. Don’t fully tighten any single blade until all of them are at least started — that lets you align them properly.
If the fan has a light kit, the light wiring is usually a quick-connect plug that mates with the receiver. Plug it in, attach the light kit to the bottom of the motor housing, then install the bulbs and globe.
First Test and Balancing
- Restore power at the breaker.
- Flip the wall switch. Fan should spin up smoothly.
- Watch the blades closely for the first 30 seconds. A small wobble is normal. A noticeable wobble — half-inch or more of side-to-side at the blade tips — needs balancing.
To balance: most fans ship with a small balancing kit (one plastic clip and a pack of small lead weights). Clip the clip to the middle of one blade at a time, run the fan, and see if the wobble decreases. The blade where the clip helps is the one that needs the weight. Move the clip toward the tip until the wobble is minimum, then peel and stick a lead weight at that spot on top of the blade (where you can’t see it from below).
A well-balanced fan should be silent except for moving air.
Common Mistakes
- Skipping the box upgrade. This is the only mistake that gets people hurt. A standard light box held in by two drywall screws and one nail will not hold a vibrating fan for years. Always upgrade.
- Forgetting the downrod for tall ceilings. Standard “flush mount” or short downrods put the fan blades 7 to 8 feet off the floor — perfect for an 8-foot ceiling. For 9-foot or higher, use a longer downrod (sold separately, usually 12, 24, or 36 inches) so the blades sit at the right height. Air circulation drops off above 8 feet of clearance.
- Reversing the fan direction in the wrong season. Counterclockwise (looking up) for summer = pushes air down, cooling. Clockwise for winter = pulls air up, mixing the warm ceiling air down without a draft. There’s a switch on the motor housing.
- Wiring the fan and light to a regular dimmer. Standard dimmers are designed for resistive loads (incandescent bulbs) and will burn out a fan motor or buzz audibly. Use a fan-rated wall control or a dual-control switch designed for fan + light.
When to Call an Electrician
- The wiring in the box is the old cloth-insulated stuff (1950s and earlier). Brittle insulation breaks off when you tug on it. Get a pro to evaluate.
- There are more than two cables in the box and you can’t figure out which is which.
- You want to add a new fan to a ceiling that doesn’t currently have a light fixture (running new wire, fishing it through walls, adding a switch — that’s a different scope).
Frequently Asked Questions
Do I need a permit to install a ceiling fan? A like-for-like swap of an existing ceiling light for a fan does not require a permit in most NJ municipalities. Adding a new ceiling fan in a location that didn’t have one before — anything that requires running new wire — does require a permit.
How heavy can the existing box hold? A standard plastic light box is rated for 50 pounds of static load — but only about 35 pounds dynamic. A fan over 35 pounds (most full-size fans are) requires a fan-rated box. The box is what’s labeled, not the bracket.
My fan wobbles even after balancing. What now? Two likely causes. First, check that all blade screws are equally tight. Second, check that the downrod set screws are seated firmly. A loose downrod transmits the smallest motor wobble straight to the blade tips.
Can I install a ceiling fan over a bed? Yes — code only requires 7 feet of clearance from the floor to the lowest point of the blade. Use a flush-mount or short-downrod fan over beds.
The Bottom Line
A ceiling fan install is a 90-minute job done well, or a 30-minute job done badly. The difference is the box. Spend the $15 and 20 minutes on the brace. The fan stays on the ceiling instead of in your bed, and that’s the entire game.
Want the full step-by-step with the wiring diagrams, downrod sizing chart, and balancing technique? See Install a Ceiling Fan.
For a project that goes beyond a single fan — a room rewire, panel work, or new fixtures throughout — send your photos for a $9.99 diagnostic report.