Every house I’ve owned has eventually needed the windows re-caulked. The original bead — whether the house is 3 years old or 30 — eventually shrinks, cracks, and pulls away from one side of the joint. Once water can sit in that crack instead of running off, the rot timer starts. By the time you see staining on the inside drywall under a window, the studs and sheathing inside that wall are already going.
Catching it early is one of the highest-value 2-hour jobs in home maintenance. Replacing rotted window framing is a five-figure repair.
Here’s how to re-caulk exterior windows so the bead actually lasts and doesn’t look terrible.
When to Re-Caulk
Walk around your house once a year — early spring is ideal — and look at every window from outside.
Caulk needs replacement when:
- Cracks in the bead that you can see from 6 feet away
- Caulk has shrunk away from one side of the joint (most often where the window frame meets the siding)
- Black or green discoloration along a section — that’s mold growing in moisture trapped in the crack
- Caulk is bone-hard and brittle — a fingernail won’t dent it. Healthy caulk has slight give.
- You can see daylight through the joint from inside
A 1/8-inch crack is enough to admit driving rain. By 1/4 inch, water gets pulled in by capillary action even without rain.
The Right Caulk for the Job
Walk into the caulk aisle and you’ll see twenty options. For exterior window perimeters, only two are right:
100% silicone (GE, Dap, Dynaflex) — best longevity (20+ years), excellent flexibility, sticks to almost anything. Downside: cannot be painted over. So use silicone only if you’re matching the existing color (clear, white, or whatever the window’s exterior trim is) and don’t plan to paint.
Polyurethane sealant (OSI Quad Max, Sika 1a) — paintable, very strong adhesion, lasts 15+ years. Best if the trim around your window will be painted, or has been painted in a custom color. Slightly harder to tool smooth than silicone.
Don’t use: acrylic-only “painter’s caulk” or generic latex caulk for exterior windows. They crack and shrink within 2 years outside. They’re for interior trim only.
You also want:
- A quality caulk gun ($15 — buy a “dripless” one with a thumb-release; the $5 ones drip everywhere)
- A 5-in-1 painter’s tool or a putty knife to remove old caulk
- A utility knife with fresh blades
- Painter’s tape (FrogTape, the yellow kind)
- A tube of denatured alcohol or rubbing alcohol and clean rags
- A spray bottle of soapy water (1 drop dish soap in 12 oz water)
Step 1: Remove the Old Caulk Completely
This is the step amateurs skip. New caulk applied over old, partially loose caulk will fail in a season. The new bead can only adhere to clean, sound surfaces.
- Score along both sides of the existing bead with a utility knife — one cut along where it meets the window frame, one along where it meets the siding.
- Use the 5-in-1 tool or putty knife to pry up an end of the bead.
- Pull the bead out in long strips wherever possible. Silicone often comes out as a continuous rubber strip; polyurethane usually breaks into shorter chunks.
- Whatever doesn’t pull out gets scraped. The goal is bare wood, vinyl, or aluminum on both sides of the joint.
- For stubborn silicone residue: silicone caulk remover gel (3M makes one). Apply, wait the time on the label (usually 2 hours), then scrape.
- After scraping, wipe the entire joint with rubbing alcohol on a clean rag. This removes finger oils, dust, and any caulk residue. Let it dry fully (5 minutes in dry weather).
Don’t move on until the joint is bare and clean. Rushing this step is the #1 cause of caulk failure.
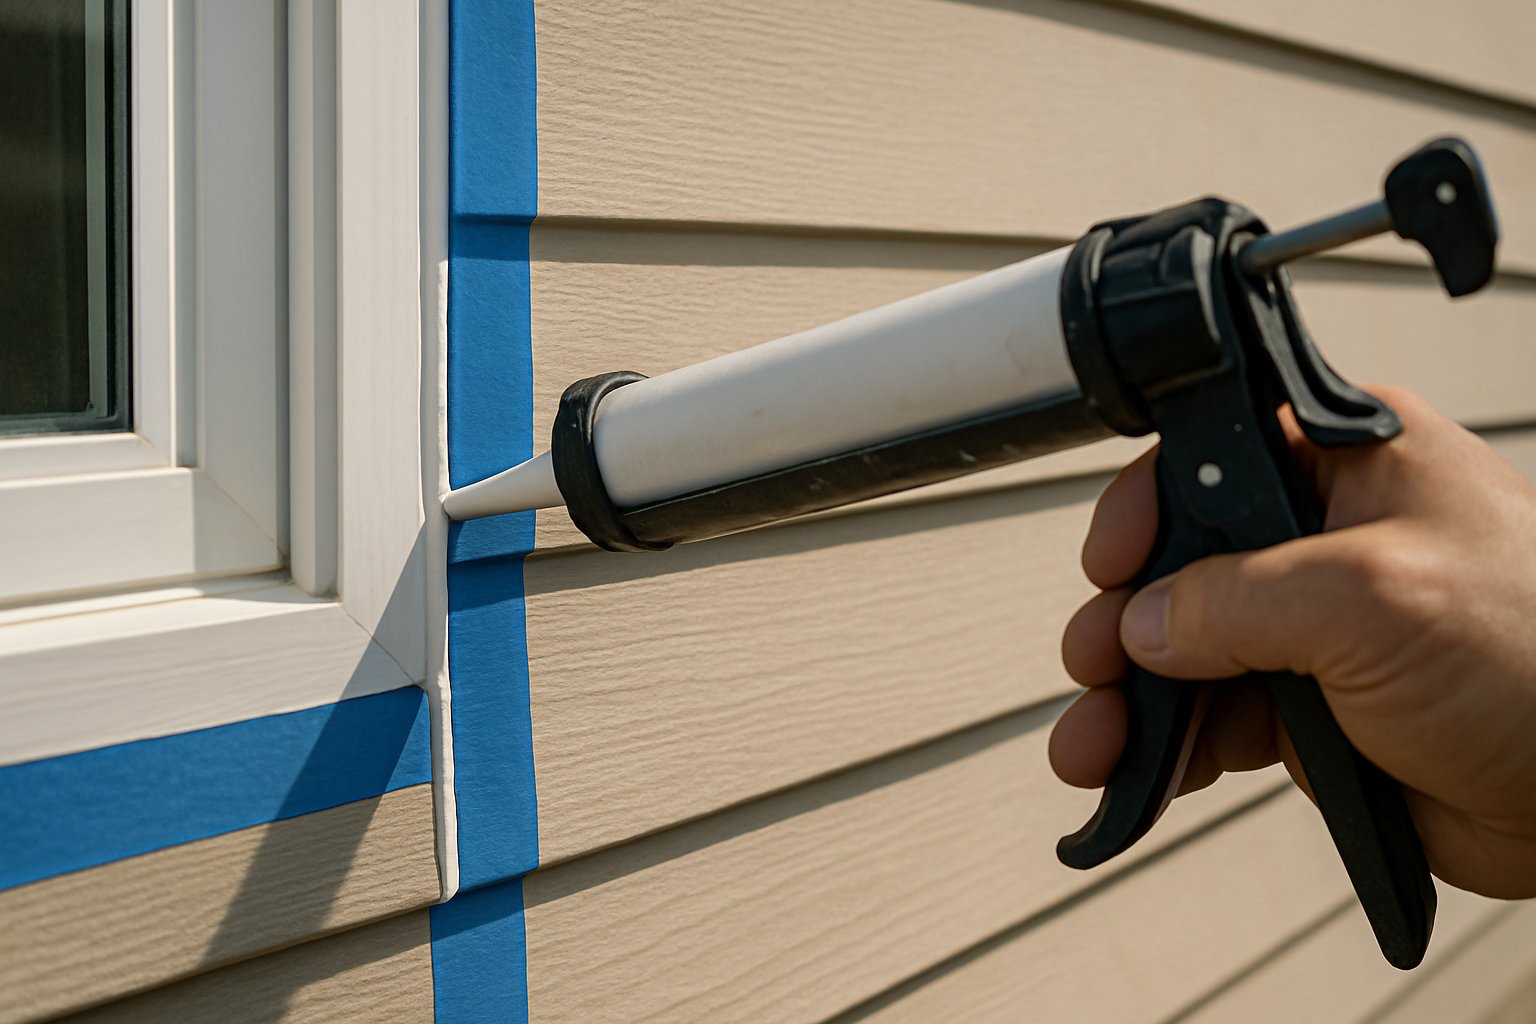
Step 2: Tape Both Sides for a Crisp Edge
The difference between a pro-looking bead and an obvious DIY one is straight edges. Tape gets you that with no skill required.
- Run painter’s tape along the window frame, just outside the joint where the new caulk will go. The tape edge defines where the caulk bead will end on that side.
- Run a second strip of tape along the siding, again just outside the joint on the other side.
- The two pieces of tape should leave a uniform gap exposed — about 1/4 to 3/8 inch wide is right for a typical window joint. Wider for larger gaps; narrower if your joint is small.
- Press the tape down firmly with a putty knife so caulk can’t seep underneath.
Step 3: Apply the Caulk
- Cut the tip of the caulk tube at a 45-degree angle. The hole size determines bead width — start with a small hole and enlarge if you need more flow.
- Puncture the foil seal inside the tube with the long wire on the caulk gun.
- Load the tube into the gun.
- Hold the gun at a 45-degree angle to the joint, with the tip’s beveled cut leading.
- Squeeze the trigger gently and start moving the gun along the joint at the same time you start the bead. The trick: don’t press the tip into the joint — let the bead flow into the joint as the tip travels above it.
- Move at a steady pace. A consistent bead requires consistent gun speed and trigger pressure. Rushing creates thin spots; pausing creates lumps.
- Don’t try to do the whole window in one continuous bead. Do one side at a time — top, then bottom, then each vertical side.
If you mess up a section: don’t try to fix it with more caulk. Wipe it away with a damp rag while still wet, and start that section over.
Step 4: Tool the Bead and Remove the Tape
This is the step that turns a pile of caulk into a clean joint.
- Mist the bead with the soapy water spray. The soap makes your tooling tool slide instead of dragging caulk.
- Use a wet (not soaked) finger, or a small caulk-tooling spoon, and run it along the bead in one smooth pass. Press just hard enough to push caulk into the joint and create a slight concave finish.
- Wipe excess caulk off your finger between passes.
- Pull the painter’s tape immediately while the caulk is still wet — within 5 minutes of applying. Pull the tape away from the bead at a low angle, slowly. Pulling fast or after the caulk has skinned over rips the bead.
- Inspect for any tiny holes or thin spots. Touch up with a dab of caulk on a fingertip, then re-tool with a wet finger.
Step 5: Cure Time
- Silicone: Skin-over in 30 minutes; fully cured in 24 hours.
- Polyurethane: Skin-over in 1–2 hours; fully cured in 48 hours; paintable after 24 hours (check the label — some are 7 days for paint).
Don’t pressure-wash the area for at least a week. Keep the caulk dry through cure time. Don’t re-caulk in the rain or with rain forecast within 24 hours.
Common Mistakes
- Caulking over old caulk. New caulk over loose old caulk peels off as a single piece in months. Always remove the old completely.
- Using the wrong caulk type. Painter’s caulk outside lasts one season. Silicone where you need to paint = stuck with the silicone color forever. Match caulk to the job.
- Cutting the tube tip too large. Big tip = lumpy, oversized bead that’s hard to tool smooth. Start with a small cut; you can always enlarge.
- Applying without taping. The skill ceiling is high. Tape gives an instant pro-grade edge.
- Tooling with a dry finger. Caulk sticks to skin and pulls out of the joint. Always wet (water for silicone, soapy water for polyurethane).
- Leaving the tape on too long. Once the caulk skins, the tape is locked in. Pull it within 5 minutes of applying.
- Working in direct hot sun. Caulk skins too fast and you can’t tool it. Work on the shaded side of the house, or pick an overcast day.
When to Call a Pro
- The wood window frame itself is soft, rotted, or punky when you scrape it. Caulk doesn’t fix rot — that needs the rotted section cut out, replaced, and primed before caulk goes near it.
- The window has settled and there’s a 1/2 inch or larger gap. That’s structural movement — caulk that big a gap won’t last; you need backer rod first or a different repair.
- You’re working at second-story height. Falls from ladders are the #1 home-DIY injury. Pay $300 for a pro to do a full house perimeter from a proper extension ladder.
- Stucco exterior with hairline cracks throughout — that’s a stucco resealing job, not a caulk job.
Frequently Asked Questions
How often does exterior caulk need to be replaced? Quality silicone or polyurethane: 15–20 years. Acrylic latex: 2–4 years and you’ll be re-doing it constantly. Inspect every spring regardless of age.
Can I caulk over rusty metal flashing? No. Caulk doesn’t bond to rust. Wire-brush the rust off, prime with a rust-converting primer (Rustoleum Stops Rust), then caulk.
Should I caulk the bottom edge of my window trim where it meets the wall? Top and sides yes, always. The bottom edge is debated — some pros leave it un-caulked so any water that DOES get behind the trim has an exit. Consensus is to caulk the bottom only if there’s a drip cap or other water-shedding detail above the window. Otherwise, leave the bottom open.
My caulk has black mold on it. Can I just paint over it? No. Mold will grow back through paint. Cut out the moldy caulk, kill the underlying mold with a 1:10 bleach-water solution (let dry), and re-caulk fresh.
The Bottom Line
Re-caulking exterior windows is the single best 2-hour preventative job a homeowner can do. The materials are cheap. The tools are basic. The technique is mostly patience and tape. Get the old caulk out completely, tape both sides, apply with a steady hand, tool while wet, pull tape immediately. Done that way, the bead lasts 15+ years and is invisible from the yard.
For the full sequence — including how to handle damaged trim, what to do when wood under the window has rotted, and how to caulk siding-to-trim joints — see Replace Exterior Caulk and Sealant.
If your exterior is showing signs of bigger water damage — staining inside on walls under windows, soft spots in trim, peeling paint near the foundation — send your photos for a $9.99 diagnostic report before it gets worse.