A tile floor that looks tired usually has tile in fine condition — it’s the grout that’s stained, cracked, or missing. Regrouting takes a weekend, costs $50-$150 in materials, and visually transforms the floor.
But three common mistakes turn this from a winning DIY into a regret-inducing mess. Avoid them and you’ll get a clean, pro-looking result.
Here’s the technique.
When to Regrout vs. When to Replace
Regrout if:
- Tile is sound (not cracked or loose)
- Grout is stained, discolored, or just looks tired
- Grout is cracked but not extensively crumbled
- You’re tired of the current grout color
Replace tile if:
- Tiles are cracking
- Tiles are loose (tap each tile — hollow sound = tile is debonded from the substrate)
- Subfloor under tile is soft (wood rot from a long-running leak)
- The tile pattern itself is dated and you want a different look
For aesthetic refresh of a sound tile floor: regrouting is dramatically cheaper than replacing.
Tools and Materials
- Grout saw (manual: $15. Electric: $40-$80, much faster for large areas. The Dremel oscillating tool with a grout-removal blade is the pro choice.)
- Rubber grout float
- Bucket
- Sponges (multiple)
- Painter’s tape
- Microfiber cloths
- Knee pads
- Dust mask + safety glasses (grout removal is dusty)
- Shop vacuum
Grout:
- Sanded grout for joints wider than 1/8 inch (most floors)
- Unsanded grout for joints under 1/8 inch (some wall tile)
- Pre-mixed urethane grout ($60+ per gallon) — easier for first-timers, no mixing, more flexible. Recommended.
- Grout sealer (for cement-based grouts only — urethane grouts are pre-sealed)
For a typical bathroom: 5 lbs of grout covers about 50 square feet of standard 12×12 tile.
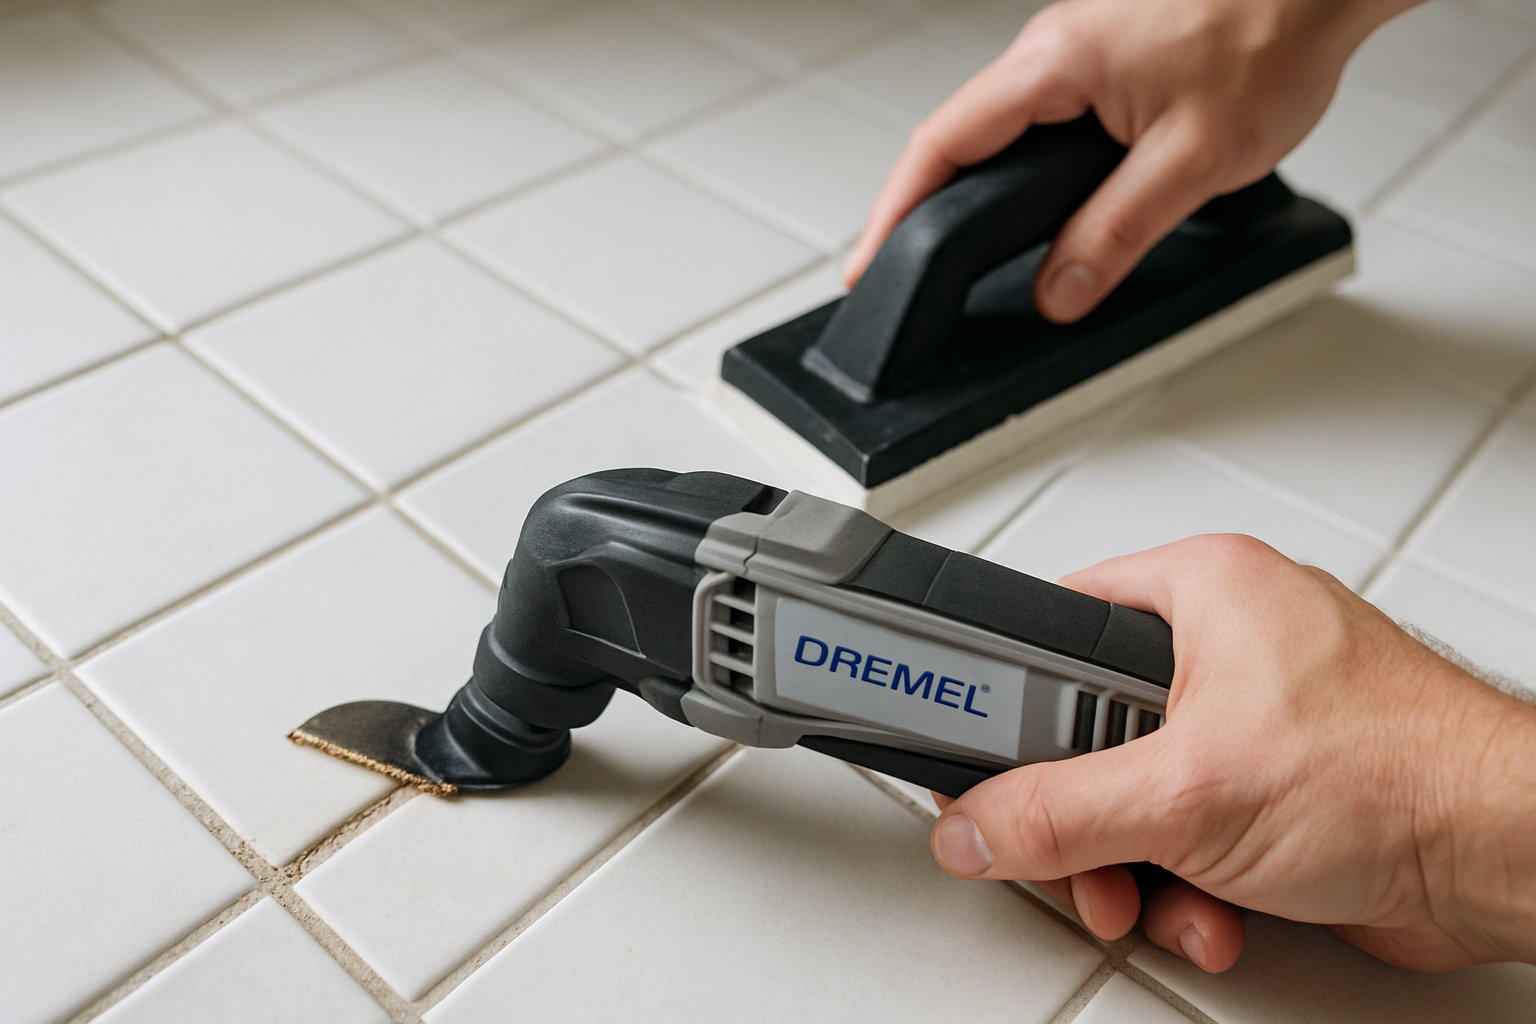
Step 1: Remove the Old Grout (THE LONG STEP)
Goal: Remove the top 2/3 of the existing grout depth without damaging the tile edges.
Manual grout saw method (small areas):
- Hold the saw at a slight angle.
- Drag along the grout line, applying steady pressure.
- Each pass removes a bit more. Don’t try to remove too deeply in one pass.
- Stop when you’ve removed grout to about 2/3 of the joint depth.
Power tool method (larger areas):
- Use the Dremel oscillating tool with a 1/16-inch grout removal blade.
- Set the speed to medium.
- Run along the grout line, keeping the blade between the tiles (don’t touch the tile edges).
- The grout disintegrates; vacuum as you go.
Critical: Don’t chip or crack the tile edges. The grout removal blade is meant to chew through grout — it’ll also eat tile if you let it slip onto the surface. Take your time.
For 100 square feet of floor with 1/8-inch grout lines: about 4-6 hours with a power tool, 8-12 hours by hand.
Step 2: Clean the Joints
After removal:
- Vacuum thoroughly to get all the dust out of the joints.
- Wipe the floor with a damp cloth to capture residual dust.
- Inspect — any remaining grout chunks should be picked out with a utility knife or screwdriver.
- Let the joints dry fully — at least 24 hours before applying new grout.
The new grout won’t bond to dust or moisture. This step matters more than people think.
Step 3: Apply the New Grout
Mix per label if using powder. Should be peanut-butter consistency — not soup, not solid.
Apply with the rubber float:
- Scoop a softball-sized blob onto the tile.
- Hold the float at 45 degrees to the tile surface.
- Press the grout INTO the joints, working diagonally to the joint direction.
- Make multiple passes from different angles to ensure the joints are fully filled.
- After about 5-10 minutes (or per label), use the float at a steeper angle to scrape excess grout off the tile surface.
- Don’t worry about residual film yet — that comes off with the sponge in step 4.
Work in 25-50 square foot sections at a time. Don’t try to do the whole floor before cleaning — the grout sets up too fast.
Step 4: Clean the Tile Surface
Critical timing — start before the grout fully cures.
- Wait the time on the label (typically 15-30 minutes) for grout to firm up.
- Wet a large sponge in clean water and squeeze most of the water out.
- Wipe the tile surface in a circular motion. Goal: remove the grout film without removing grout from the joints.
- Rinse the sponge frequently. A muddy sponge just smears the haze around.
- Multiple passes — each pass with a clean sponge removes more haze.
- After about 2-3 hours, a residual chalky haze is normal. Don’t try to remove it now — let the grout cure overnight.
Step 5: Final Haze Removal and Sealing
After 24-48 hours (per label):
- Buff the haze off with a dry microfiber cloth.
- For stubborn haze: a 50/50 white vinegar + water solution helps. Don’t use anything stronger or you’ll affect the grout.
- For cement grouts only: apply grout sealer per label. This is what makes the grout stain-resistant. Skip this step and the new grout will look just as stained as the old grout in 2 years.
- Urethane and epoxy grouts don’t need separate sealing — they’re already waterproof.
Common Mistakes
- Removing grout too deep. Going to the full depth of the joint exposes the substrate underneath, which can lift tile or create a soft spot. Stop at 2/3 depth.
- Chipping the tile edges with the grout saw. Once chipped, those edges show forever. Take your time.
- Applying new grout over dust. Won’t bond. Vacuum thoroughly first.
- Not waiting long enough between haze cleaning passes. Wiping too soon pulls grout out of the joints. Wait the recommended time.
- Skipping the sealer on cement grout. New grout that isn’t sealed stains like the old grout did. Always seal cement-based grouts.
- Walking on the floor too soon. Grout cures over 24-72 hours. Walking on it during cure pulls the grout below the tile surface, leaving low spots.
When to Hire It Out
- Large areas (over 200 square feet) — the grout-removal labor becomes prohibitive
- Severely damaged grout that may indicate water damage to the substrate
- Stone tile (different grouting techniques and sealing requirements)
- Decorative tile or mosaic patterns where precision matters
The Bottom Line
Regrouting is one of the highest-visual-impact maintenance projects in a house. A tired-looking tile floor becomes new again for $50-$150 in materials and a weekend of careful work. The technique is straightforward; the patience for grout removal is what separates good results from bad.
For the full sequence including grout color selection, the special techniques for shower walls, and the substrate-repair scenarios, see Regrout a Tile Floor.
For a tile floor that needs more than regrouting (loose tiles, water damage, planning a replacement), send your photos for a $9.99 diagnostic report.