A sump pump fails predictably during the storm where you need it most. Burnout from years of cycling, a stuck float switch, or a clogged impeller — by the time you realize, water is on the basement floor and you’re shop-vacuuming at 2 a.m.
The fix is to replace the pump on a schedule, not on a failure. A new pump is $150-$300. The swap is a one-hour DIY job. Doing it every 7-10 years (or at the first sign of weakness) prevents the bigger problem.
Here’s the sequence.
Signs Your Pump Is About to Fail
- Cycles on and off rapidly during runtime — float switch failing or impeller clogged
- Visible rust on the motor housing — moisture has penetrated; soon will short
- Constant running even when pit isn’t full — float is stuck open
- Burning smell or unusual noise during operation — bearings going
- Pump is over 7 years old — even if working, replace proactively
A pump can also “work” but pump too slowly to keep up with a heavy storm. If you’ve noticed water level rising during heavy rain even with the pump running, it’s underpowered or losing capacity.
Pick the Right Pump
Submersible vs. pedestal: Submersible (sits in the pit) is the modern standard — quieter, more reliable. Use unless you have specific reason for pedestal.
HP rating: 1/3 HP handles most residential basements. 1/2 HP for high water table or sustained pumping. Bigger isn’t always better — oversized pumps cycle more frequently, which wears them faster.
Cast iron vs. plastic: Cast iron lasts longer but costs more ($250 vs. $150). For pumps that run frequently, cast iron pays back. For occasional-use backups, plastic is fine.
Battery backup: Strongly recommended. Power often fails during the same storms that overwhelm sump pumps. Battery-backup pumps run when the primary fails or AC is out. Add $200-$400 for a battery backup unit.
For a typical basement: 1/3 HP cast iron submersible primary + battery backup secondary. Around $400-$600 total.
Tools and Materials
- The new pump (kit usually includes basic plumbing fittings)
- 1.5” or 2” PVC pipe and fittings (match your existing discharge line)
- New check valve (the part that prevents water from flowing back into the pit)
- PVC primer + cement
- Hacksaw or PVC cutter
- Bucket
- Channel-lock pliers
- Tape measure
- Voltage tester
- Towels
Step 1: Disconnect the Old Pump
Unplug the pump. It plugs into a dedicated outlet near the pit, often on a “piggyback” plug that lets the float switch act as the on/off control.
Disconnect the discharge pipe. Use a hacksaw or PVC cutter to cut the discharge pipe a few inches above the check valve. You’ll splice in a new piece later.
Remove the old pump.
- Reach into the pit (yes, with your hands — there’s no avoiding it).
- Lift the pump out by its handle or power cord.
- Place in a bucket — they leak water everywhere.
Inspect the pit:
- Clean out debris, sediment, gravel
- Check the pit walls for cracks or damage
- Verify the inlet (where ground water enters) is clear
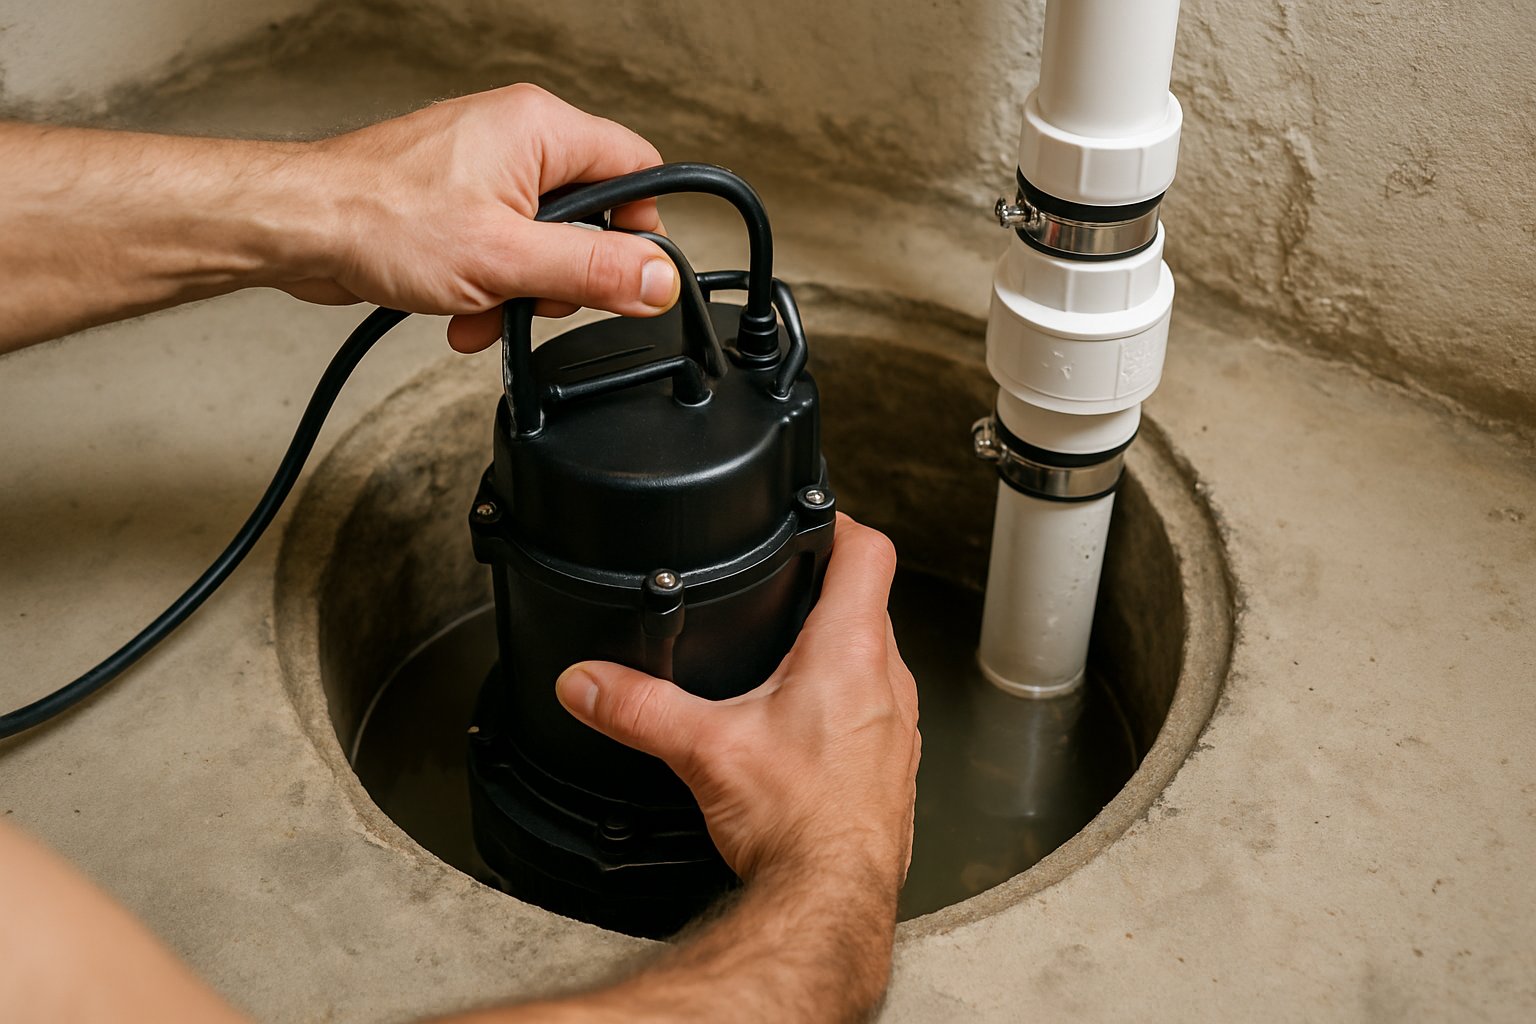
Step 2: Install the New Pump
Attach the new check valve. Most pumps thread directly into a 1.5” or 2” PVC adapter. Apply Teflon tape to the threads and thread the adapter onto the pump’s discharge port.
Attach a short stub of PVC pipe to the adapter — usually 6-12 inches.
Lower the pump into the pit:
- Pump should sit flat on the bottom
- Float switch should have at least 6 inches of clearance from the pit walls (or it’ll bind and not trigger)
- Power cord runs up and out of the pit
Splice the new discharge pipe to the existing line:
- Measure the gap between the top of the new pipe stub and the cut end of the existing discharge.
- Cut a piece of PVC to length.
- Use a PVC coupling at each end.
- Apply primer (purple), then cement, to both pipe ends and the inside of each coupling.
- Push together with a 1/4 twist. Hold 10 seconds while it sets.
Plug it in. The pump should not run yet (pit is empty). Float switch is in the down position.
Step 3: Test
Pour water into the pit with a bucket. As the water level rises, the float should lift and trigger the pump. Pump should:
- Run smoothly with no rattling
- Discharge water out the pipe
- Stop when the water level drops below the float’s reset point
If the pump runs but water doesn’t come out the discharge: the impeller is clogged or the check valve is installed backwards.
If the pump doesn’t run: float switch isn’t reaching the trigger position. Adjust the float position or untangle from the cord.
Common Mistakes
- Skipping the check valve. Without it, water in the discharge pipe falls back into the pit when the pump shuts off. The pump cycles constantly emptying the same water. Burns out fast.
- Float switch tangled in the cord. Float can’t lift, pump never triggers. Always route the cord clear of the float arc.
- Using the wrong PVC cement. Pressure-rated discharge needs proper PVC primer + cement, not just glue. Skipping primer is the most common cause of leaking joints later.
- No air bleed hole. Some pumps need a 3/16-inch hole drilled in the discharge pipe just above the pump (below the check valve) to prevent air-locking. Read the manual.
- Plugging into a regular outlet without a backup plan. A power outage = no pump. Always have a battery backup or a secondary plan.
Adding a Battery Backup
If you don’t have one, this is the install you do at the same time. Battery backup pumps install alongside the primary (in the same pit or a sister pit). They include a marine deep-cycle battery that lives near the pit and a charger that maintains it on AC power.
When AC fails or the primary pump can’t keep up, the backup kicks in. Most run 5-7 hours on a charged battery — enough for most outages.
Cost: $300-$500 for the system, $150 for the battery. Install in 2-3 hours. Genuinely worth it for any basement that contains anything you’d hate to lose.
When to Call a Pro
- The discharge pipe runs through the foundation or has complex routing
- The pit is undersized or improperly drained
- You suspect the drain tile feeding the pit is clogged (different problem)
- The basement floods even with a working pump (capacity issue — needs analysis)
The Bottom Line
A sump pump replacement is one of the most consequence-driven preventative projects in a house. Replacing on schedule (every 7-10 years) prevents the failure that ruins a basement. The DIY version saves $200-$400 over a plumber.
For the full sequence including drain tile evaluation, battery backup install, and the pit upsizing scenarios, see Replace a Sump Pump.
For a basement waterproofing review or planning a finished basement that requires upgraded water management, send your photos for a $9.99 diagnostic report.