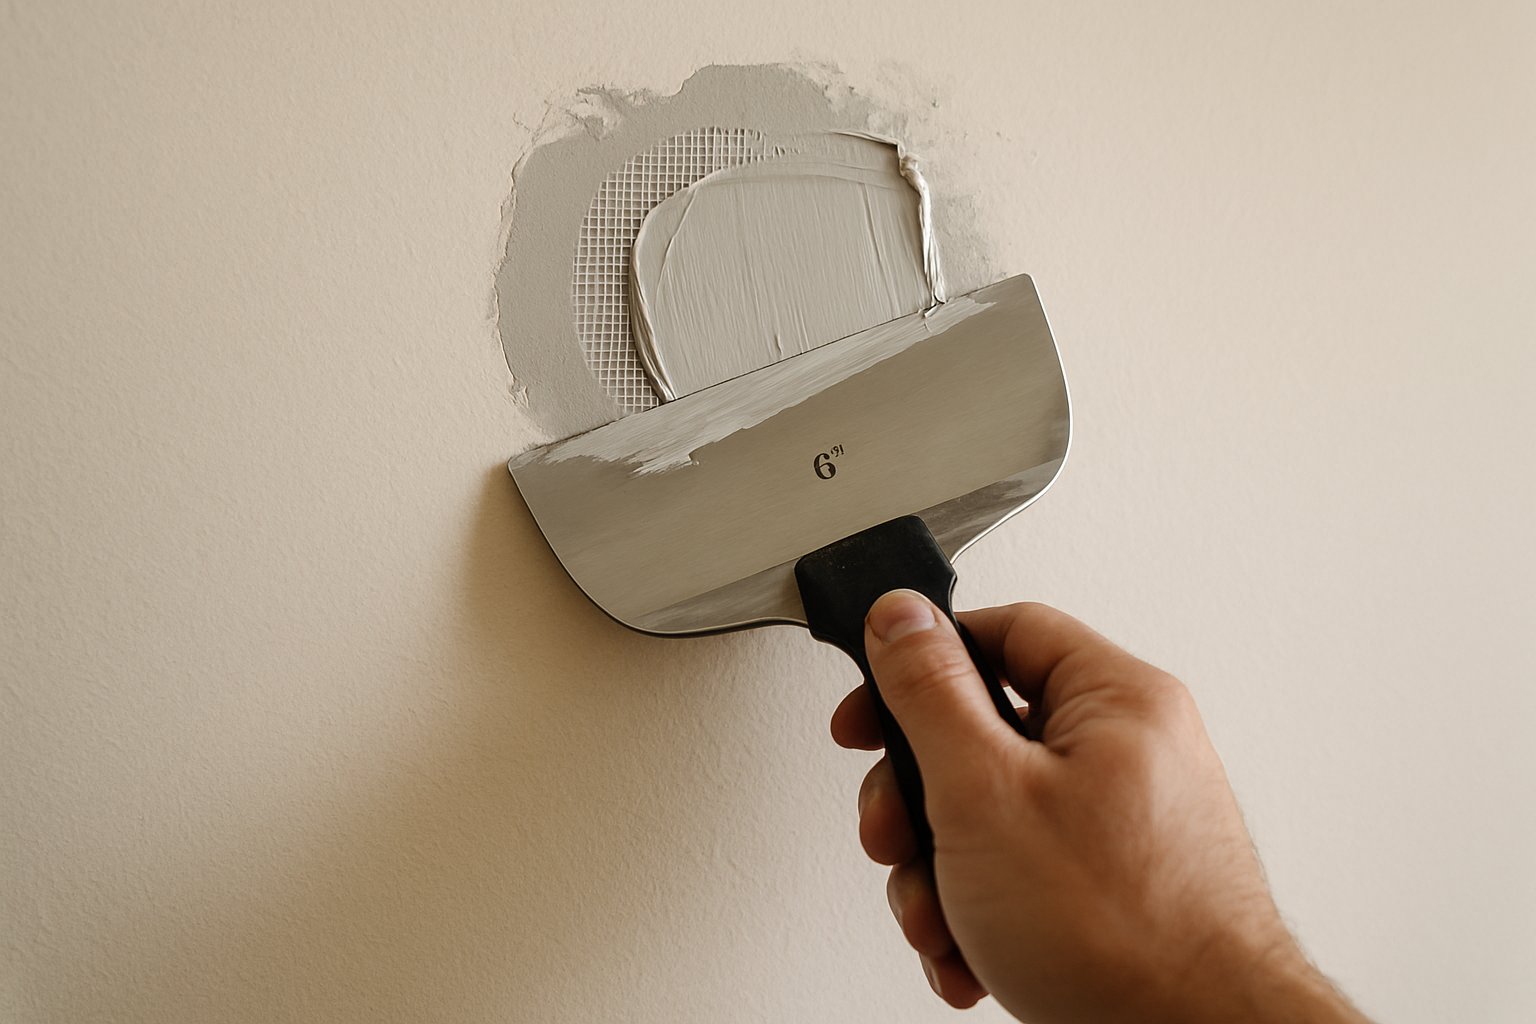
You’ve done a perfect drywall patch — feathered, sanded, primed. Then you realize the surrounding wall isn’t smooth. It has orange peel, knockdown, splatter, or some other texture. Your perfect smooth patch now stands out as obviously flat in the middle of textured walls.
Texture matching is the part of drywall repair people skip until they’ve botched it once. It’s not hard, but it’s specific to the texture type. Get the type identified, get the technique right, and the patch genuinely disappears.
Here’s the approach for each of the four common interior wall textures.
Step 1: Identify the Texture Type
Stand 3 feet from the wall and look at it in raking light (light from the side, not straight on).
Orange peel: Looks like the surface of an orange — fine bumps, all roughly the same size, 1/16-1/8 inch tall. Most common modern texture.
Knockdown: Larger flat spots with raised edges — a “splattered then flattened” look. Often used in ceilings.
Splatter / popcorn (ceilings): Heavily textured ceiling with visible “popcorn” globs.
Skip-trowel / Spanish lace: Hand-applied texture with visible trowel marks. Common in 1970s-90s houses.
Smooth (no texture): Just smooth painted drywall. Easiest case — your patch matches if it’s well sanded.
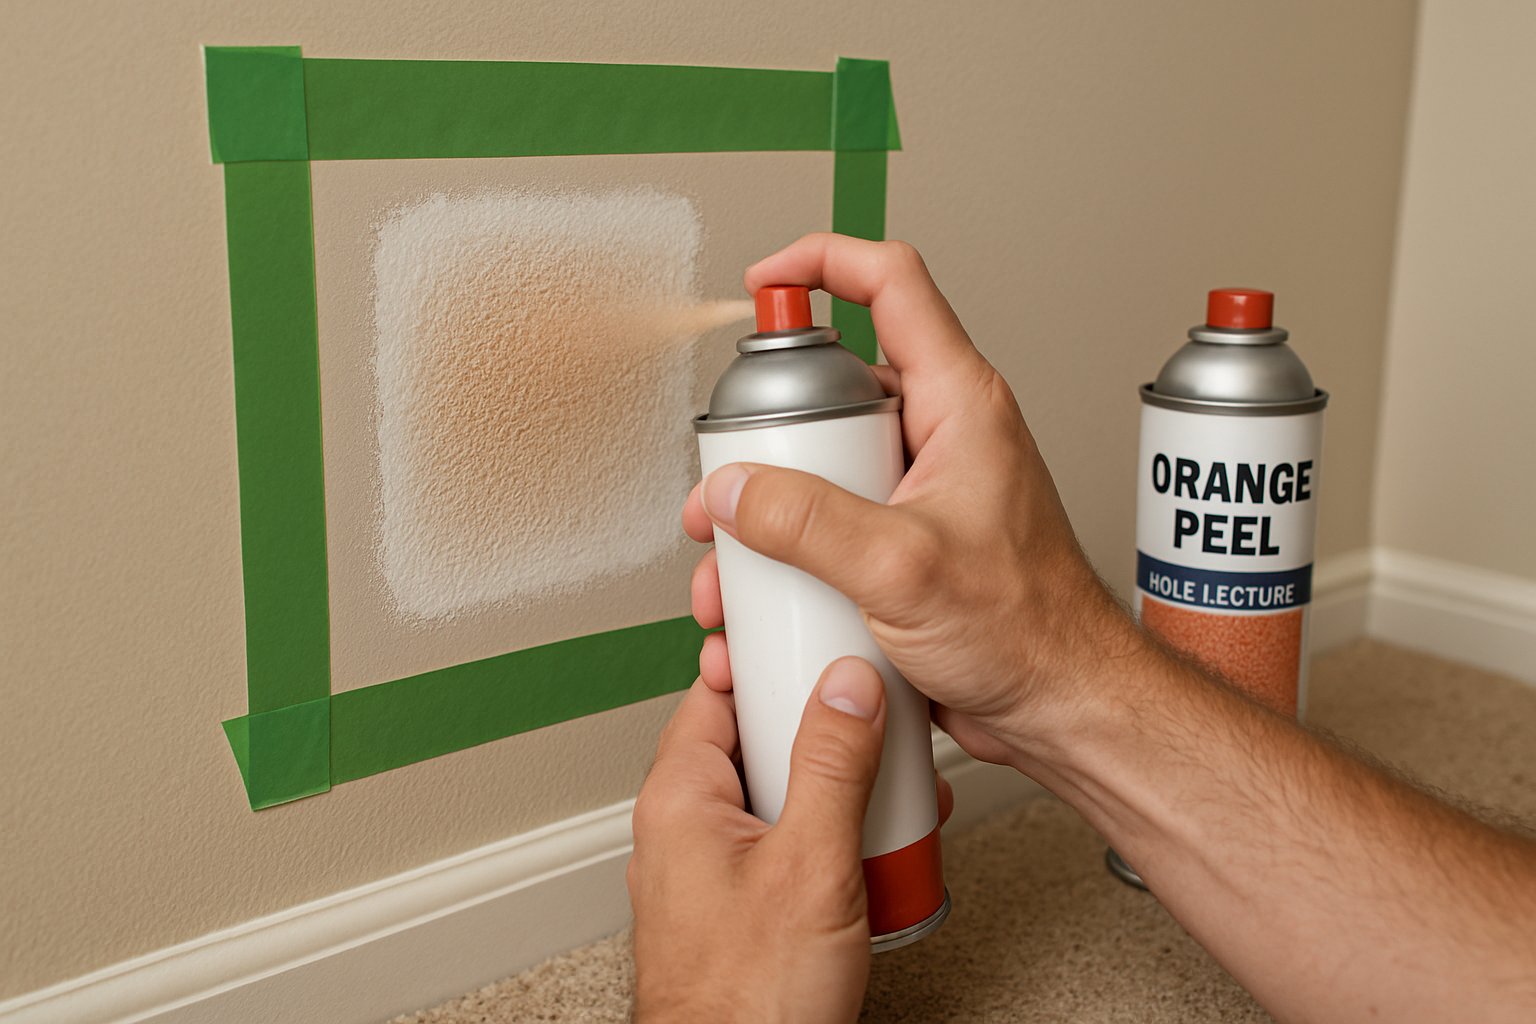
Method 1: Orange Peel (Most Common)
The cheapest fix: a can of aerosol orange-peel texture from any hardware store ($8-$12).
Technique:
- Prime your patch first (don’t skip — prime helps texture adhere uniformly).
- Mask off the patch + 6 inches of surrounding wall with painter’s tape and plastic sheeting on the rest of the wall.
- Read the can label for spray distance — typically 12-18 inches.
- Test first on cardboard. Adjust the nozzle for “fine” or “coarse” to match your wall.
- Spray short bursts — 1/2 second at a time — over the patch. Build up gradually. Easier to add more than remove excess.
- Feather the spray pattern at the edges into the surrounding wall.
- Wait 5-10 minutes for the texture to set up but not fully dry.
- Inspect — is the bump density and size right? If too sparse, more spray. If too dense, lightly knock down the high points with a damp sponge.
- Let dry fully (often 24 hours), then prime + paint.
The match isn’t always perfect on the first try. Practice on cardboard first if you’ve never done it.
Method 2: Knockdown Texture
Two-step process: spray on, then “knock down” the peaks with a knockdown knife.
Tools:
- Aerosol knockdown texture or thinned joint compound + texture hopper gun ($30-$60)
- An 18-inch knockdown knife (looks like a wide flexible scraper)
Technique:
- Prime patch.
- Spray texture in heavy splats — visible blobs about 1/4 inch tall.
- Wait 5-15 minutes for the texture to set up but not dry. Surface should look slightly dull but still slightly tacky.
- Run the knockdown knife flat across the texture in a single smooth pass. Just enough pressure to flatten the tops of the splats — not so much that you scrape it off.
- Let dry completely.
- Prime + paint.
Timing matters more than skill here. Too soon = you smear the splats. Too late = they don’t flatten. Test on cardboard.
Method 3: Splatter / Popcorn (Ceilings)
Aerosol popcorn texture in a can, or popcorn texture mix from a hardware store.
Aerosol method:
- Mask everything below — drop cloths, plastic, the works. This stuff goes everywhere.
- Apply primer to the patch.
- Hold the can 12-15 inches away.
- Spray in random patterns to build up the popcorn texture.
- Don’t try to get full coverage — popcorn ceilings have visible thin spots.
Bucket method (for larger areas):
- Mix the texture per label into a thick paste.
- Apply with a paint roller dipped in the mix and rolled lightly on the ceiling. Or use a hopper gun for a more even spray.
- Don’t try to make it perfect — popcorn looks “bumpy and random” by design.
Note: many popcorn ceilings (pre-1980) contain asbestos. NEVER scrape a popcorn ceiling without testing first. Patching is fine; removal is hazmat.
Method 4: Skip-Trowel / Spanish Lace
Hand-applied texture. Hard to match perfectly without practice — but doable for small patches.
Technique:
- Prime patch.
- Use a 6-inch drywall knife and a small batch of joint compound thinned to a yogurt-like consistency.
- Apply compound in thin random arcs, partly overlapping, leaving sections of the wall visible between the trowel marks.
- Vary the angle and pressure to mimic the surrounding pattern.
- Let dry, then knock down any sharp edges with a sanding sponge.
- Prime + paint.
This is more art than technique. If you have lots of skip-trowel walls, practice on a piece of scrap drywall before working on the actual patch.
Common Mistakes
- Painting before texture matching. You’ll have to paint twice. Texture first, then prime, then paint once.
- Not priming the patch before texturing. Texture absorbs unevenly into raw drywall mud, gives a blotchy result.
- Spraying too thick with aerosol. Dripping texture is impossible to fix. Light bursts, build up gradually.
- Trying to match texture in less than ideal lighting. Always evaluate matches in raking light from the side. Direct light fools you.
- Skipping the test pattern on cardboard. Each can of aerosol texture sprays slightly differently. The 60 seconds testing on cardboard saves you from a botched wall.
When to Hire It Out
- Whole-room texture matching after a major repair
- Skip-trowel or hand-applied textures requiring real skill
- Popcorn ceilings that may have asbestos (testing first, then either patch carefully or hire abatement for removal)
- Areas where the existing texture has degraded badly enough that matching is impractical and re-texturing the whole wall makes more sense
The Bottom Line
Texture matching transforms a competent patch into an invisible one. Identify the texture type first. Match the technique. Aerosol cans handle 80% of orange peel and knockdown patches. Pop ceilings get aerosol popcorn. Skip-trowel takes practice.
For the full sequence including the rare textures, larger-area matches, and the asbestos-test workflow for old ceilings, see Texture-Match a Drywall Repair.
For texture work across multiple rooms or after a major repair, send your photos for a $9.99 diagnostic report.