Replacing washing machine hoses takes 20 minutes, costs $20 for a pair of braided stainless replacements, and is the single highest-ROI preventive plumbing task in any house. Washing machine hose failures are among the top causes of insurance flood claims — they burst without warning at full water pressure, often when nobody’s home.
If your hoses are rubber (not braided stainless), are 5+ years old, or you don’t know their age — replace them this weekend.
Why Washing Machine Hoses Fail
Unlike a supply line under a sink (cold water only, low flow, intermittent use), washing machine hoses carry:
- Hot and cold water (two hoses)
- Full city pressure, continuously (most homes 55–80 psi)
- High flow rates (the washer can draw 3+ GPM during fill)
- Daily use over years
Combined, that’s a brutal service environment. Rubber hoses degrade from ozone, heat, and pressure cycling. Pinhole leaks form first; catastrophic rupture follows.
Failure pattern: A rubber hose will often develop a small leak that you might not notice (behind the washer, in the wall, or into a nearby drip pan) for weeks. Then at some point — always when you’re not home — it bursts fully, pumping 3+ GPM into the laundry room floor until someone shuts it off.
Rubber vs. Braided Stainless
- Rubber hose: 5–8 year life. Fails without warning. $5 each.
- Braided stainless steel: 10–20 year life. Fails slowly, with visible warning signs (bulging, small leaks). $10 each.
Cost difference: $10 total. Every plumber recommends stainless. There’s no reason to buy rubber.
Tools & Materials
- Two braided stainless washing machine hoses (typically 4’ or 6’ long)
- New rubber washers (usually included in new hoses — if not, get flat washers separately)
- Adjustable wrench or channel-lock pliers
- Bucket
- Rag and paper towels
- Optional: plumber’s tape (usually not needed — see below)
Step-by-Step: Replace the Hoses
1. Shut Off Both Water Valves
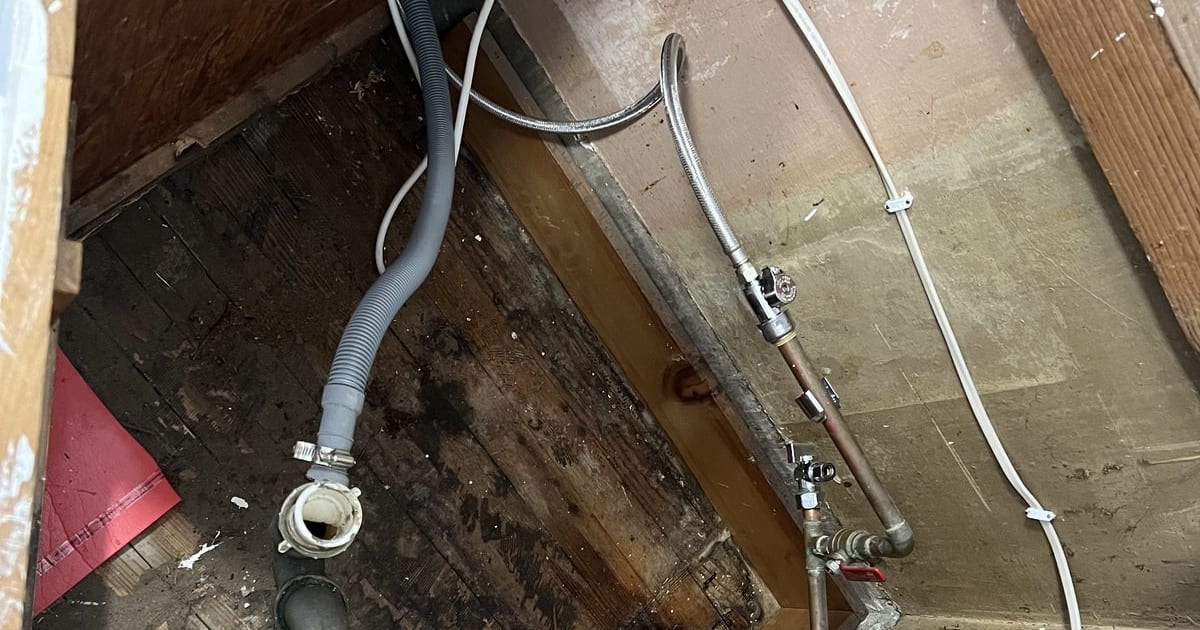
Behind the washing machine, there are two valves (hot and cold) — often on a single valve box mounted in the wall.
Turn both clockwise to shut off. For single-lever combo valves, press down or turn the single lever to the off position.
2. Move the Washer Out
Pull the washer away from the wall far enough to reach behind it. You’ll need access to both the valve box and the rear of the washer.
3. Disconnect the Old Hoses
Put the bucket under the connections. Loosen the hose nuts at the wall (valve) end with a wrench. Cold side first. A small amount of water drips out.
Then loosen the nuts at the washer end.
If a hose is stuck, wrap a rag around the nut and use channel locks. If it still won’t budge, spray penetrating oil and wait 10 minutes.
4. Inspect the Valves and Washer Inlets
Check the threads on both the wall valves and the washer’s water inlet fittings. Any corrosion should be wiped clean. Check the valves themselves — if they’re old plastic (common in houses 20+ years old), consider replacing them too (separate job, requires shutting off main).
5. Install the New Hoses
Put a new rubber washer inside each hose fitting (most braided stainless hoses come with washers pre-installed). Confirm the washers are seated flat.
Connect the wall end first — hand-tight plus a quarter to half turn with the wrench. The color coding on the hose (red=hot, blue=cold) helps match ends, though hoses are fully reversible.
Connect the washer end — same process, hand-tight plus a quarter turn.
6. Don’t Use Plumber’s Tape
Washing machine hose connections use rubber washers to seal — not threaded metal-on-metal contact. Teflon tape on the threads can prevent the washer from seating correctly. Skip the tape here.
7. Turn the Valves Back On
Slowly open each valve. Watch the connections. A slight weep in the first few seconds is normal (the washer is seating); persistent drip means tighten another eighth turn.
Let water sit in the hoses for 2 minutes. Check every connection with a paper towel — zero moisture = success.
8. Run a Test Cycle
Push the washer back into position. Run a short wash cycle to pressurize the hoses. Check behind the washer again afterward.
Bonus: Install an Auto-Shutoff Valve or Flood Stop
If your washer is on an upper floor or over a finished space, consider installing a water hammer arrestor + auto-shutoff valve:
- FloodStop — senses leak, shuts off water automatically. $100–$200.
- Floodsafe hoses — built-in mechanical shutoff when flow exceeds a certain threshold. $20 per pair.
For a second-floor laundry, FloodSafe hoses at minimum, auto-shutoff for extra protection.
Also: Turn Off the Valves Between Loads
If your hoses are under constant pressure 24/7/365, they fail faster than if the water is only live during the wash cycle.
Best practice: Turn off both valves after each wash. This is tedious by hand, which is why single-lever combo valves ($30, DIY-installable) exist — one lever, flips on and off in a second.
If you don’t do this, at minimum shut the valves off when you’re traveling for more than a day.
Common Mistakes
- Keeping rubber hoses “because they still work.” They work until they don’t. The cost of failure is thousands of dollars in water damage; replacement is $20. Just do it.
- Overtightening. Crushes the rubber washer. Hand-tight plus a quarter to half turn.
- Using plumber’s tape. Prevents the rubber washer from seating properly.
- Not replacing washers. Old washers harden and leak. New hoses come with new washers — use them.
- Forgetting to turn the valves back on. Easy to do. Laundry tonight? Check first.
When the Valve Box Itself Is Old
Washing machine valve boxes with plastic valves (common in homes from the 1990s–early 2000s) can fail at the valve itself — stripped handles, cracked housings, weeping even when closed. If yours is aging, replacing the valve box is a more involved job that requires:
- Shutting off the main water to the house
- Cutting the supply pipes feeding the box
- Installing a new box (plastic or metal-bodied, depending on your preference)
- Sweating or PEX-crimping the new connections
Full replacement is $150–$400 with a plumber. DIY if you’re comfortable with soldering or PEX.
Frequently Asked Questions
How long do washing machine hoses last? Rubber: 5–8 years. Braided stainless: 10–20 years. Both depend on water quality and use frequency.
Why are my new hoses leaking at the connection? Usually overtightening (crushed washer) or a missing washer. Disconnect, check the washer, reinstall.
Should I buy 4’ or 6’ hoses? Whatever fits without stretching or kinking. 6’ is more flexible for positioning. Never install with a kink.
Do I need to shut off water to the whole house? No. The valves behind the washer are the local shutoffs. Use those.
What causes a “water hammer” bang when the washer fills/drains? Rapid valve closure creates a pressure surge in the line. Install a water hammer arrestor at the washer valve box — quiets the bang and reduces stress on your hoses.
Can I use a longer hose to put the washer further from the wall? Up to 8’ is generally safe. Beyond that, flow restriction and increased failure risk. If you need more distance, plumb the valves closer to the machine.
The Bottom Line
$20 and 20 minutes prevents one of the most common and expensive home floods. If your hoses are rubber, do this today. If you don’t know when they were last replaced, replace them. And shut off the valves when you travel.
If you’re planning a laundry room remodel or want a plumbing plan tailored to your specific project, send your photos for a $9.99 diagnostic report.